Monday, May 10, 2010

Indian Fast Food

My husband’s family is Indian from Fiji. And, Tin Fish Tarcurry or Tarkari, the Bengali term for curry, is an old family standby when a quick, healthy meal is desired in an instant.

I was recently cruising the aisles of a local market and discovered some fresh, organic turmeric, which looks identical to ginger except for the lovely orange yellow colour on the inside. I decided to learn how to make my husband’s family recipe, and to include my newfound fresh turmeric.

My son Ilan just gobbles this dish up and once it’s finished, he then tries to lick the bowl. I’m dead serious.


Tin Fish Tarkari Recipe

Ingredients

A tin of wild unsalted salmon (empty the water and rinse)
Note: We’re not wild about tinned food at Weemunch…the lining, aluminum, high sodium and preservatives aren’t the best, but, once a week isn’t anything to worry about. You could also use fresh fish if it’s readily available, as it’s still quick and easy to cook.
An onion
Spices: Cumin, Turmeric, Unrefined Salt, Pepper, Chili Flakes, garlic
Organic, Spinach (optional)
Fresh Tomatoes (optional)
Butter and olive oil

1. On medium heat, in a large frying pan or saucepan, melt a pat of organic butter with a couple of tablespoons of olive oil
2. Then add your chopped onion and cover, letting it simmer until translucent and curled.
3. Then add some chopped garlic, a teaspoon of cumin, turmeric, and a dash of salt and pepper (to taste) and a small sprinkling of dried chili flakes. Stir and let simmer for a few moments to infuse the oils, onions and spices.
4. Then add your tinned salmon. Stir in and blend with the spices. Then add some spinach until wilted. Serve on its own or with brown rice, couscous, or roti. Enjoy!


Sunday, May 2, 2010

Edible Art

Increasingly children’s art supplies are being made from food grade materials. And it seems they’re good enough to eat. Well almost. Beeswax, olive oil, natural pigments, food grade essential oils are just some of the ingredients you can now find in your crayons, pencil crayons, paints, and play dough.

From about twelve months onwards you can gently introduce your little one to art making…earlier if you think your child is just that daring. Don’t expect extended play…maybe just a few moments of curious exploration of the materials that will lead to a lifetime of enjoyment and more importantly focused relaxation.

It’s often costly and expensive to purchase truly non-toxic art supplies and the quest for these little gems can be time consuming. But for me, it’s an important investment. I’ve seen Ilan’s generous teeth marks on one too many a crayon. Food grade art supplies also offer more sensory exploration, as they just look, smell, and feel more refined than conventional products.

WeeMunch (Almost) Edible Art Supplies

Crayons by Stockmar

Made in Germany with pure beeswax, these high quality non-toxic crayons come in standard and block forms. Stockmar crayons can be used in many interesting painting techniques, ranging from simple layering to sgraffito with a scraping tool, or even challenging encaustic and melting techniques for when your children are older.

Play dough, Pencil Crayons and Paints by Eco Kids USA

Eco Dough is no ordinary play dough. It is a molding dough handmade with flour, salt, cream of tartar, organic rosemary oil, vitamin E oil, soybean oil, coconut oil, potassium sorbate, citric acid, natural and organic fruit, plant and vegetable extracts from beets, spinach, paprika, carrots, purple sweet potato, red cabbage, blueberries and tomatoes.

Eco-colored pencils are made from recycled newspaper, wax, natural mineral pigments and glue derived from corn and potatoes.

Eco-paint is a powder paint handmade with flour, cornstarch, seaweed, natural and organic fruit, plant and vegetable extracts from beets, spinach, paprika, carrots, purple sweet potato, red cabbage, blueberries and tomatoes.

Believe it or not, Eco Kids USA have also created gluten-free formulations. All play with art must be supervised by an adult at each and every stage.

Monday, April 26, 2010

Celebrating Dandelions

Every year at about this time a wonderful thing happens. The dandelions appear.

To some they are a nuisance. I don’t think they are a nuisance at all. In fact, I love to see their sunny faces. My little Oskar loves to pick them for me and present them with sheer excitement as the most wonderful bouquet for Momma. How could you not love them? When they age and they are only a white orb of feather-light seeds he delights in blowing them across the lawn unknowingly spreading them for next season’s rebirth.

Did you know that dandelions are edible? That’s right, they are totally edible; flowers, leaves and roots. And all parts contain their own healing properties but overall they are very beneficial to our Liver and Gallbladder, as are many of the things sprouting from the ground at this time of year. An old family friend always snaps a stem and rubs the white school glue-like serum onto his age spots, stating that it helps diminish them. It kind of makes sense actually as age spots or ‘Liver Spots’ as they are also referred to are a sign of an aging Liver that perhaps is in need of some antioxidant nourishment.

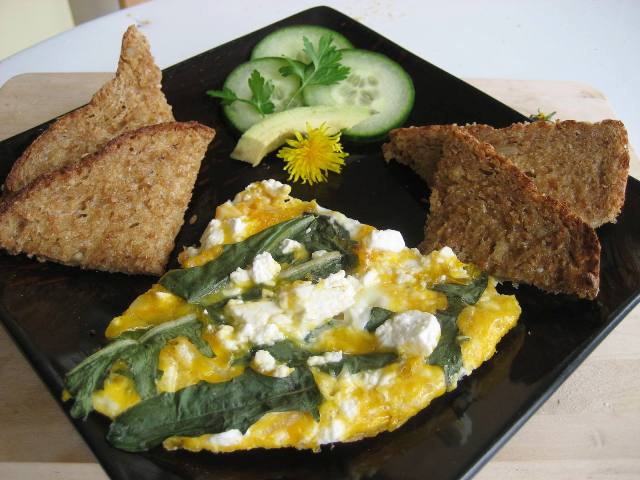
Dandelions are only one of the many weeds that we deem annoying and are quick to pull out or poison. Some others that are fantastically nourishing (ironic huh?) are chickweed, cleavers, clover and yarrow. (Truth be known, I made a chickweed pesto once that was quite delicious!) Recently, my husband got the brilliant idea to put some dandelion greens into an omelette. I was delighted! Why didn’t I think of that? So today I decided to make another one in celebration of our wonderful sunny-faced weeds that seem to be everywhere right now just begging to be eaten up! I also know that Oskar is more likely to eat these things when I engage him in the harvest so he happily helped and even arranged a little bouquet for the table.

Hint: Gather up some dandelion leaves and flowers, from somewhere you know they have not been sprayed with yucky chemicals or pee'd on by wayard pets, and put them into an omelette as you would spinach. Don’t use too much of these greens as they tend to be bitter and may be too overpowering especially for delicate little taste buds. I find I can get away with using them if I break them up a bit and only use a thin layer. I use the flowers as a garnish and they can also be broken up and sprinkled on top for garnish. *Also a great addition to spring salads.


Some great accompaniments to the dandelions in your omelette are: goat feta & caramelized onion (which we used), fresh tomatoes, organic bell pepper, bok choy and/or wild mushrooms.
If you happen to have harvested the root also, clean it and steep it in boiling water for a cleansing tea. You can also dry it and store it in a jar for tea at a later date.
Important: This tea is safe for children over 2 in very small dose and lightly steeped. Please consult an herbalist for more specific details or to use dandelion medicinally.

Sunday, April 18, 2010

Kobucha Soup

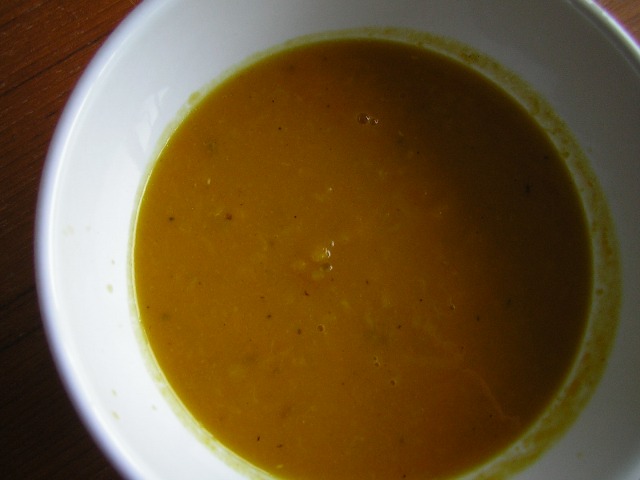
What child doesn’t love gazing at and eating anything with the colour orange? We’ve gone through carrots, yams, butternaut squash. And, I’ve been looking for something new. That is, until my mother brought home an organic Japanese pumpkin, also known as Kobucha, from a market in North Vancouver. It weighed no more than 2 pounds and had a lovely tough bark-like skin. Ilan explored the new textures of its skin while playing on the floor, until I had the chance to wash it and roast it for a soup.

Kobucha is actually considered best in season in late summer and early fall. It’s usually one of the veggies offered in tempura in Japanese restaurants, which I always thought was yam…but not quite yam.

Nutritionally, as with other orange vegetables, Kobucha is rich in beta carotene, along with iron, vitamin c and potassium, with trace amounts of calcium, folic acid and B vitamins.

When you bring it home, to draw out its rich flavours, leave your Kobucha in a warm dry place for 10 to 15 days to ensure that it is fully ripened. Then it can live in your fridge for up to a month to increase the carbohydrate content. This process draws out the smooth, sweeter flavours and will have a reddish-yellow skin. Kobucha is expected to reach the peak of ripeness 1.5 to 3 months after it is harvested.


How to Make Soup with Your Kobucha

Many people have their own way of making soup. And, this is my way to draw out the maximum flavours in this squash.

1. Wash and cut your Kobucha in half and removed the pith and seeds with a spoon
Cut into small squares
2. Place on a baking sheet and add a small amount of olive oil, unrefined salt and pepper. Mix with your hands and then place in a pre-heated oven at 365 Degrees for approximately 40 to 50 minutes or until soft and slightly browned (this ensures that the natural sugars are drawn out)
3. While your Kobucha is cooking, take three or four beef bones or chicken bones and heat with oil/organic butter, unrefined salt/pepper in a large soup pot.
4. Stir and cook for five to 10 minutes on a medium heat until you’ve lightly browned your bones.
5. Add cold water and bring to a boil and then let simmer on a low heat, but maintaining some boiling action, for 1 to 2 hours
6. Remove your Kobucha from the oven, let cool and then and remove the skins, as these are too tough to eat. And, place the reddish-orange skins in the cooking soup broth. Let the broth and Kobucha cook together until the squash has fallen apart and integrated into the broth.

NOW…because I like to go by feel…my soup was quite watery. I over-estimated the portions and made too much broth for my tiny Kobucha. And, hunger often dictates here. Rather than adding flour or starches at this stage to thicken your soup, add a small handful of organic red lentils. The beauty of red lentils is that they do not need to be soaked overnight and they work beautifully as a thickener in soups. I always have red lentils in my cupboard to eat on their own or to add to soup. And, because you are only adding a small amount…you’ll still retain that sweet, smooth flavour of the Kobucha, adding a further healthy kick from your lentils.

To maximize flavours…you could try adding a pinch of cinnamon and raw honey or you could go the other way and roast some garlic and add that at the end and season to taste. I like texture in my soup…so it didn’t require any pureeing, but that’s also an option. Serve with a dollop of whole fat yogurt or sour cream…and it’s to die for.

Monday, April 12, 2010

Peanut Butter Cups Anyone?


I didn’t want to do the common candy over-kill this Easter so I decided to make homemade peanut buttercups. I incorporated a recipe I use often for my favourite peanut butter cookies (although uncooked) along with my favourite stand-by chocolate chips. And what do you know, it worked!

They were a real hit at our little eater egg hunt last Sunday and were gobbled up in a flash. They’re pretty easy to make with not much mess. If you like these two flavour combinations you’re sure to like this recipe.

Note about Peanut Allergies: If you suspect a peanut allergy in your child, or if anyone in your immediate family has one, use almond butter as a substitute. I believe that the way non-organic peanuts are grown is actually in large part to blame for the widespread peanut allergies in North America. It is one of the most toxic crops out there in terms of chemical sprays and fertilizers used to grow it. I won’t even touch non-organic peanut butter (in fact, my husband gets a mild allergic reaction to non-organic peanut butter only). Read More about allergies to peanuts.

Peanut Buttercup Recipe

You’ll need:½ standard size jar organic peanut butter (approx. 1 cup)
1/2 cup unrefined sugar (Go to Post on Sugar to find out more)
1 free-range, non-medicated egg (If want an eggless version use about 1 tbsp. fresh ground flax seed – grind as fine as you can)
1 tsp. unrefined salt1 pkg. dark chocolate chips (I use Ghirardelli brand)
1 small ice cube tray that is rounded on the bottom.
*Or use actual tiny foil cups to look like a pro

Follow Our 8 Simple Steps:
1.) Mix above ingredients, except the chocolate.
2.) Roll up little balls of the peanut butter mixture so that they’ll fit into the ice cube tray easily and stay within the chocolate ‘wrap’.

3.) Melted the chocolate in a double boiler on med. heat until just melted thoroughly – be careful not to overdue or it will thicken and not be pourable.

4.) Ensure that the tray compartments or foil cups are well-buttered to ensure the ‘cups’ do not stick.

5.) Half fill with melted chocolate.

6.) Pop the pre-rolled peanut butter balls gently on top of the half-filled chocolate so they sink down (be careful not to push too hard)

7.) Cover with more melted choc. until all the peanut butter ball is well-covered.

8.) Put into freezer for about 1/2 hour.

Then, pop them out of the tray and enjoy!

Sunday, April 4, 2010

Silver Streak

Using a silver spoon isn’t just a sign of privilege. In the days before plastic, then bpa-free plastic, utensils for baby to eat with, the use of silver was and continues to be anti-bacterial, particularly in the era before fridges, antibiotics and unpronounceable preservatives were added to foods to make them last an eternity.

"Settlers in the American West used silver dollars in jugs of milk to keep the milk from spoiling. Silver nitrate drops have been used in newborn babies' eyes to prevent infection after birth. With the growth in popularity of antibiotics, silver has seemed to be less necessary for health. Pacifiers have replaced silver teething rings and plastic toys are used instead of silver rattles." [Source]

Though we have more alternatives now, I’m not sure I always trust them. We splurged and bought our son a silver spoon when he was born. Though not quite born with a silver spoon in his mouth, six months later it was the first spoon he used. And, after dozens of alarming news articles about recalled plastic cutlery, various sippy cups, and plate sets for children that purported to be safe, I’ve always been happy that we made the investment. Who knows…maybe our son’s first child will use that silver spoon one day.

Non-toxic Method for Cleaning Silver

1. use a mug or glass that can handle hot water, and the right fit for the object you wish to clean

2. line the bottom with aluminum foil

3. place one or two tablespoons of baking soda on the tin foil

4. pour boiling water, and as the baking soda is bubbling (almost instantly) drop the object in

5. Rinse and dry the object. Presto! Perfectly cleaned silver w/o scrubbing or using toxic cleaners

Sunday, March 28, 2010

Teaching Children the Art of 'Down-Time'

My 90 year-old friend Betty is always saying "It's a mad, mad world." And, from a certain perspective she is right, especially when it comes to our schedules these days. How often do you find yourself thinking or saying "It's been a really hectic week!" Or my recent favourite "Life has been moving at a frightening pace," which I have been saying far too often lately.

Inevitably we are subjecting our children to these crazy schedules of ours. Soon, their calendars are filling up as fast as ours are with play-dates, sports and other activities. How do we keep a balance and have the time to even breathe let alone practice personal hygiene?

Well, I believe one way to strike a balance in today's hectic life is to take time for the still things. Stop and smell the roses so to speak. Take moments to stop and look at a delicate cherry blossom, smell a fragrant flower, admire the ocean or mountains, take a deep breath of fresh air, enjoy a fun moment with your child... and slowly exhale, turning off your mind for a moment, letting go of the constant to-do list and brrrrrrreeeeeaaaaaatttthhhhhhhhhhhhhe...........

My friend, who is a massage therapist, has a motto: "Being still is doing something." I think it is brilliant. We, women in particular, are such high achievers, such stalwart champions to the point where we are even very competitive with each other. We seem to not be able to stop for a moment because, god forbid, we may look like we're being lazy or unproductive. Well, the irony is that we tend to be much more productive in the long run when we take the time to rest our minds and bodies and let ourselves just be for a few moments.

These little, quality things are monumental in their advantages to our health and wellness and do not even take much time out of our day. And it is a wonderful influence to have on our children despite these frenetic times running from task to task, errand after errand.

When it comes to eating, we have a great opportunity to take advantage of being in the moment. Start by having as little distraction as possible while you and your kid(s) eat. Use conversation to point out the characteristics of the food you are eating. For example sometimes I'll say to Oskar, "How do you like how that feels in your mouth? Is it soft, squishy, hard or smooth? What flavours are you tasting? What colour is your broccoli/carrot/beet? What flavours are in your soup?" Or perhaps you can just reflect on the day and recognize what you are grateful for. Now that's an easy and rewarding thing to do regularly!

These are wonderful ways to a reconnect with your body, mind and spirit. It will also strengthen your body's ability to digest and metabolize and, therefore, its ability to absorb nutrients. It may sound a little strange but this practice ultimately acts as a distraction from your typically overactive left brain that actually creates a lot of physical stress in our bodies. This is why yoga and meditation have become so popular in our culture. We need it to stay sane and to find some balance in such an overproductive, competitive culture.

So next time you sit down to have a meal, turn off the television, put down the to-do list and focus on the food and your time with your family. It will pay off in dividends and you may just find your life is just a little more manageable.

*The following are some helpful links to help you be better nourished, manage the stress of your schedule, learn to incorporate a brief meditation into your day or perhaps even take a yoga class with your child:

Good Enough Moms website: Check out the podcast: Are you getting the most out of your meals, nutritionally and emotionally?

Transform stress in 30 days with One Moment Meditation (This week's e-newsletter article on Oprah's website)

Little Tree Yoga


Bowen Island Wellness Retreats: watch for our upcoming Mother's Day retreat announcement

Related Posts with Thumbnails